This blog describes how to build a distance measurement tool based on the ESP8266 module.
Introduction
The ESP8266 is a low-cost Wi-Fi microchip with full TCP/IP stack and microcontroller from Espressif Systems. It can be used as client or access point and it has DNS support as well. The chip is the main component in the ESP modules, which are developed by Ai-thinker to embed Wi-Fi capabilities within other systems, or to function as a standalone system.
The ESP modules has several firmware options to choose from:
- The default AI-Thinker firmware
- Arduino – a popular platform
- NodeMCU – an open source firmware, NodeMCU that uses the Lua scripting language.
- MicroPython – stripped down python 3.
- Official Espressif.
- ESP8266 BASIC – lets you run BASIC programs from a web browser.
This project will use Arduino IDE to program the ESP8266 ESP-12E NodeMCU 1.0. If this is your first time using the ESP8266 module, then I suggest you take look at one of these links for an introduction and to learn how to program the modules using the Arduino IDE.
- https://www.electronicshub.org/esp8266-arduino-interface/
- https://www.instructables.com/id/The-First-Usage-of-NodeMCU-ESP12E-DEVKIT-V2/
Or check the full ESP8266 documentation,
Before you continue, make sure the board “NodeMCU 1.0 (ESP-12E Module)” is selected in the Arduino IDE’s Tools menu. Also make sure that you select the correct COM port.
Hardware Components
- 1.3 Inch 4Pin OLED LCD Display 128×64 I2C Module (see Note 1)
- Ultrasonic Distance Measuring Sensor HC-SR04
- Breadboard Solderless Prototype PCB Board
- Jump wires
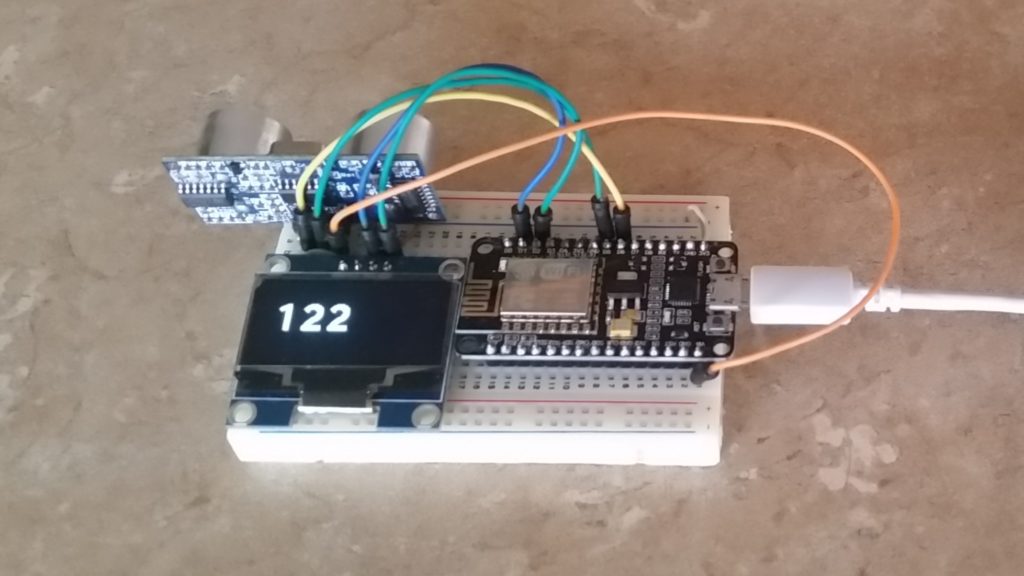
Wiring
The diagram below shows how to connect the components. Here is the detailed wiring description:
- OLED VCC – NodeMCU 3.3V
- OLED GND – NodeMCU GND
- OLED SCL – NodeMCU D1
- OLED SDA – NodeMCU D2
- HC-SR04 VCC – NodeMCU Vin
- HC-SR04 GND – NodeMCU GND
- HC-SR04 Trig – NodeMCU D6
- HC-SR04 Echo – NodeMCU D5
Note that the ultrasound sensor requires 5V, so it is connected to the Vin pin which is directly connected to the USB’s 5V supply.

Libraries
In addition to the above software, you need to download the Arduino libraries for the OLED screen and the ultrasound sensors. To do so, use the Arduino IDE’s Library Manager and add these two libraries:
- Bifrost library for HCSR04: This library returns distance in millimeters
- U8g2 library: For the OLED screen
Code
Now you are ready to write the code to read the distance measurement from the ultrasound sensor and display the result on the OLED screen.
/*
  Range_to_OLED.ino

  This code reads distance measurements from ultrasound sensors and displays the
  data to OLED screen.
*/

#include <U8g2lib.h>
#include <hcsr04.h>

// define constants
#define TRIG_PIN 14
#define ECHO_PIN 12
#define MIN_RANGE 20
#define MAX_RANGE 4000

#define DELAY 250 //msec

// defines variables
int distance;
char cstr[8];

// initialize the ultrasound sensor
HCSR04 hcsr04(TRIG_PIN, ECHO_PIN, MIN_RANGE, MAX_RANGE);

// initialize the screen (for SH1106 controller with I2C interface)
// SCL is the clock pin, MCU pin D1 (GPIO5)
// SDA is the data pin, MCU pin D2 (GPIO4)
// There is no reset pin
U8G2_SH1106_128X64_NONAME_F_SW_I2C u8g2(U8G2_R0, SCL, SDA, U8X8_PIN_NONE);

void setup(void) {
  u8g2.begin();
}

void loop(void) {
  distance = hcsr04.distanceInMillimeters() / 10;

  u8g2.clearBuffer();
  u8g2.setFont(u8g2_font_inb21_mf);
  u8g2.drawStr(10, 40, itoa(distance, cstr, 6));	// write to the buffer
  u8g2.sendBuffer();					         // transfer buffer to the display
  delay(DELAY);
}
Compile and upload the code into the NodeMCU. Once you point the sensor to an object (choose one with flat surface like a wall), you will see the distance in centimeters displayed on the small screen.
Note 1: The screen comes with either SSH1106 controller or SSD1306. This project uses SSH1106.