Experimenting with Software Defined Networks (SDN) on real hardware has become a lot easier since I discovered the Zodiac FX switch from Northbound Networks. This 4-port switch supports Openflow v1.0 and v1.3, and it supports many Openflow controllers.
This post describes the process of connecting the Zodiac FX switch with a Raspberry Pi, which runs an Openflow controller and SDN applications. This setup is intended for SDN-related research or training. But my goal here is to start the first step towards building a software defined home network.
I chose the Faucet controller for this implementation. This controller has been featured recently as a solution suitable for deployments in enterprise networks. This first phase of the implementation is a replication of the original post by Josh Bailey at https://faucet-sdn.blogspot.ca/2016/06/raucet-raspberry-pi-faucet-controlling.html.
Before we begin, I assume the reader has basic knowledge of the following:
- Software Defined Networking
- Linux OS (specifically Raspbian distro, which is based on Debian)
Hardware Components:
- Raspberry Pi 2 Model B (Rev 1.1)
- Zodiac FX Rev A (Firmware 0.68)
- Two or more devices for testing network connectivity
- Ethernet cables
Notes and assumptions:
If you want to replicate this implementation, you should note that I connect to the RP using Wi-Fi to free up the Ethernet port for switch connectivity, and I use Putty as a SSH client. It is also possible to connect to the RP directly using a keyboard and monitor. I use pico to edit various files; you can use any editor you prefer.
I also assume that you will install any missing software and tools that you need on the RP as you follow this post. The links will give you all the details you need.
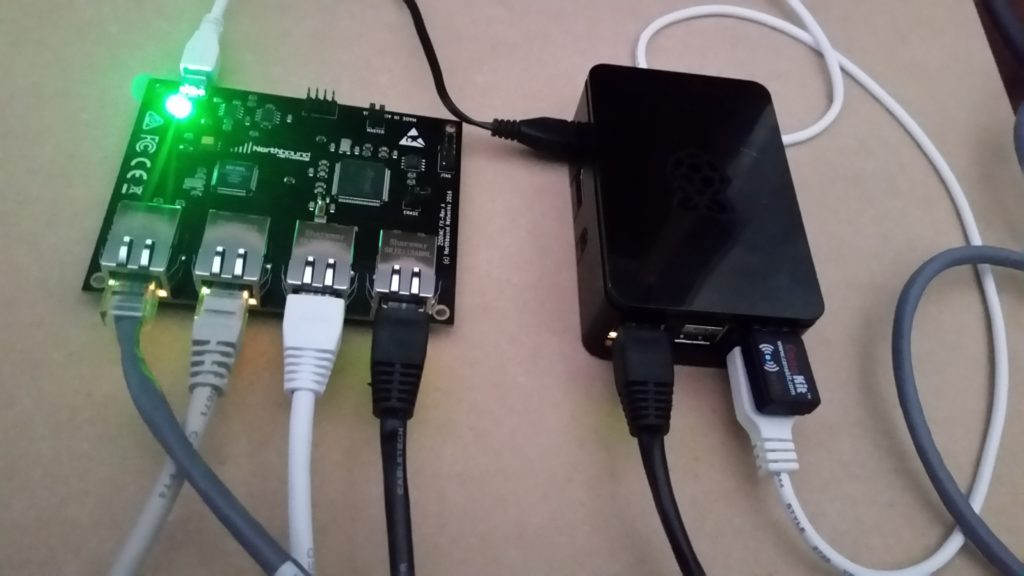
Connectivity between RP and ZFX:
We begin by connecting the Raspberry Pi to the Zodiac FX switch. The RP will supply power to the ZFX via the USB cable included with the ZFX. Connect an Ethernet cable between the RP and port 4 on the ZFX. Plug the supplied USB cable into the ZFX and the RP. Then power up the RP. The switch should not have any other connections.
Log into the RP and edit the file “/etc/network/interfaces “to add or modify the IP address on the interface connecting to ZFX
sudo pico /etc/network/interfaces

auto eth0
iface eth0 inet static
address 10.0.1.8
netmask 255.255.255.0
gateway 10.0.1.99
Restart network services using the following command:
$ sudo /etc/init.d/networking restart
Verify connectivity to ZFX:
$ ping 10.0.1.99
The ZFX will appear in Debian as the serial device /dev/ttyACM.
$ dmesg | grep Zodiac
[    3.080257] usb 1-1.2: Product: Zodiac
Use Minicom to log into ZFX:
$ sudo apt-get install minicom
$ minicom --device /dev/ttyACM0

Zodiac_FX# config
Zodiac_FX(config)# show config
----------------------------------------------------------------
Configuration
Name: Zodiac_FX
MAC Address: 70:B3:D5:6C:D5:86
IP Address: 10.0.1.99
Netmask: 255.255.255.0
Gateway: 10.0.1.1
OpenFlow Controller: 10.0.1.8
OpenFlow Port: 6633
Openflow Status: Enabled
Failstate: Secure
Force OpenFlow version: Disabled
Stacking Select: MASTER
Stacking Select: Disabled
---------------------------------------------------------------
Zodiac_FX(config)# exit
Zodiac_FX#
Connecting to RYU Controller
The Ryu Controller is an open software-defined networking (SDN) Controller. For an introduction to Ryu and quick installation guide, visit this site and this. The following worked for my Raspberry Pi 2.
$ sudo apt-get update
$ sudo apt-get install python-eventlet python-routes python-webob
$ sudo apt-get install python-paramiko python-yaml libpython-dev
$ sudo apt-get install tinyrpc ovs oslo.config msgpack-python
$ sudo apt-get install --upgrade eventlet
$ sudo pip install ipaddr
$ sudo pip install --upgrade six
$ git clone git://github.com/osrg/ryu.git
$ cd ryu
$ sudo python ./setup.py install
Verify that Ryu is installed properly:
$ ryu-manager --version
ryu-manager 4.9
Once Ryu is installed, start the controller using the command:
$ ryu-manager --verbose ryu/ryu/app/simple_switch.py
You will see output like this:
loading app ryu/ryu/app/simple_switch.py
loading app ryu.controller.ofp_handler
instantiating app ryu/ryu/app/simple_switch.py of SimpleSwitch
instantiating app ryu.controller.ofp_handler of OFPHandler
BRICK SimpleSwitch
CONSUMES EventOFPPortStatus
CONSUMES EventOFPPacketIn
BRICK ofp_event
PROVIDES EventOFPPortStatus TO {'SimpleSwitch': set(['main'])}
PROVIDES EventOFPPacketIn TO {'SimpleSwitch': set(['main'])}
CONSUMES EventOFPEchoRequest
CONSUMES EventOFPEchoReply
CONSUMES EventOFPHello
CONSUMES EventOFPPortDescStatsReply
CONSUMES EventOFPPortStatus
CONSUMES EventOFPSwitchFeatures
CONSUMES EventOFPErrorMsg
connected socket:<eventlet.greenio.base.GreenSocket
object at 0x272ccb0> address:('10.0.1.99', 49236)
hello ev <ryu.controller.ofp_event.EventOFPHello
object at 0x2734290>
move onto config mode
switch features ev version=0x1,msg_type=0x6,msg_len=0xb0,
xid=0xe755531bL,OFPSwitchFeatures(actions=1779,capabilities=7,
datapath_id=123917682136454L,n_buffers=0,n_tables=1,
ports={1:OFPPhyPort(port_no=1,hw_addr='cb:4e:3e:a4:00:30',
name='eth0',config=0,state=0,curr=136,advertised=0,
supported=0,peer=0), 2:OFPPhyPort(port_no=2,
hw_addr='9d:ab:65:6d:8d:bf',name='eth1',config=0,state=0,
curr=136,advertised=0,supported=0,peer=0), 3: OFPPhyPort(port_no=3,
hw_addr='e4:b9:3f:35:4b:c9',name='eth2',config=0,state=1,
curr=136,advertised=0,supported=0,peer=0)})
move onto main mode
…
Connect two IP devices to ports 1 and 2 in the ZFX switch and configure their IP addresses to be on the same subnet. They should be able to ping each other.
Log into the ZFX using Mincom again and navigate to the Openflow context to check the status:
Zodiac_FX# openflow
Zodiac_FX(openflow)# show status
----------------------------------------------------------------
Status: Connected
Version: 1.0 (0x01)
No tables: 1
No flows: 5
Total Lookups: 1561
Total Matches: 1162
----------------------------------------------------------------
You can stop the controller by hitting CTRL-C or
$ sudo killall ryu-manager
Installing Faucet
Faucet is an Open Source Python-based Layer 2/3 switch controller for managing production networks. Faucet supports many traditional networking features, including: VLANs, ACLs, IPv6, Port Mirroring, Layer 3 routing, etc. An introduction to Faucet and quick installation guide can be found at https://github.com/REANNZ/faucet. More documentation can be found at https://github.com/REANNZ/faucet/tree/master/src/docs
This implementation is a replication of the original post by Josh Bailey at https://faucet-sdn.blogspot.ca/2016/06/raucet-raspberry-pi-faucet-controlling.html. Some details are changed or added.
Create a folder for the ZFX configuration files and create the yaml file shown below. Replace dp_id with the MAC Address of your ZFX:
$ mkdir /home/pi/zodiacfx
$ sudo pico /home/pi/zodiacfx/zodiacfx.yaml

version: 2
dps:
  zfx-switch-1:
  dp_id: 0x70B3D56CD586
  interfaces:
    1:
      native_vlan: 40
    2:
      native_vlan: 40
    3:
      native_vlan: 40
  vlans:
    40:
      name: "TEST_VLAN"
Supply the environment variables for the configuration and log files:
$ export FAUCET_CONFIG=~/zodiacfx/zodiacfx.yaml
$ export FAUCET_LOG=~/zodiacfx/faucet.log
$ export FAUCET_EXCEPTION_LOG=~/zodiacfx/faucet_exception.log
Start Faucet
$ ryu-manager ~/faucet/src/ryu_faucet/org/onfsdn/faucet/faucet.py –verbose
You should see output similar to the one produced by Ryu in the previous section (Faucet is an application of Ryu.)
At this point the two devices connected to ZFX should be able to ping each other and if you log into ZFX, the status of Openflow should look like this (notice the Openflow version is changed to v1.3).
Zodiac_FX# openflow
Zodiac_FX(openflow)# show status

----------------------------------------------------------------
Status: Connected
Version: 1.3 (0x04)
No tables: 7
No flows: 57
Total Lookups: 21443
Total Matches: 21443
----------------------------------------------------------------
Looking at the log files, you will see
$ more ~/zodiacfx/faucet.log
Dec 17 15:45:11 faucet DEBUG    DPID 123917682136454 (0x70b3d56cd586)
 connected
Dec 17 15:45:11 faucet.valve INFO     Configuring DPID 123917682136454
 (0x70b3d56cd586)
Dec 17 15:45:11 faucet.valve INFO     Configuring VLAN vid:40
 ports:1,2,3
Dec 17 15:45:11 faucet.valve INFO     Port 1 added
Dec 17 15:45:11 faucet.valve INFO     Sending config for port 1
Dec 17 15:45:11 faucet.valve INFO     Port 2 added
Dec 17 15:45:11 faucet.valve INFO     Sending config for port 2
Dec 17 15:45:11 faucet.valve INFO     Port 3 added
Dec 17 15:45:11 faucet.valve INFO     Sending config for port 3
Dec 17 15:45:11 faucet.valve DEBUG    Packet_in DPID 123917682136454
 (0x70b3d56cd586) src:00:30:67:b1:d8:47 in_port:1 vid:40
Dec 17 15:45:11 faucet.valve INFO     learned 1 hosts on vlan 40
Dec 17 15:45:12 faucet.valve DEBUG    Packet_in DPID 123917682136454
 (0x70b3d56cd586) src:d4:04:cd:9c:f0:e8 in_port:1 vid:40
…
At this point your ZFX will work as regular Layer 2 switch. I used mine to replace one of the switches at home. More about this later.