IR Receiver setup
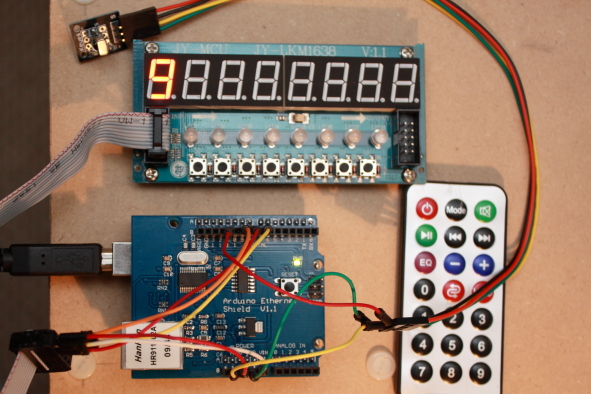
This post describes how to use the Keyes IR Receiver Module in a practical application. The setup used in this experiment is shown in the picture to the right and it includes Arduino UNO card (hidden under an Ethernet shield), a display module JY-LKM1638, a Keyes IR Receiver module and a remote controller. The last two items are often sold together.
The connections are made as shown in the following tables. I found that the IR module works with either V5+ or V3.3+. The pin labels for the display module are printed in the backside of the card.
| Arduino Pin | Description | TM1638 | IR Receiver |
| VCC | +5V | VCC | |
| 3V3 | +3.3V | + (middle) | |
| GND | GND | GND | – |
| D6 | Digital Pin 6 (PWM) | ||
| D7 | Digital Pin 7 | STB0 | |
| D8 | Digital Pin 8 | DIO | |
| D9 | Digital Pin 9 (PWM) | CLK | |
| D10 | Digital Pin 10 (PWM) | ||
| D11 | Digital Pin 11 (PWM) | S | |
| D12 | Digital Pin 12 |
Once wiring is made, you should use the display module library and the IR module library for the rest of this post.
Run the example IRrecvDemo and use the serial monitor to observe the output. Every time you point the remote controller to the IR receiver and press a button you will notice that its LED blinks and the output (in the form of 6 hex numbers) appears on the monitor. If your press is a bit long, a string of 8 ‘F’s appears after the the 6 digit code, as shown below. Note also that all valid codes has ‘FF’ in the high significant digits, so the unique part of the code is only four-digit long.
FFB04F
FFB04F
FF6897
FFFFFFFF
FF52AD
FFFFFFFF
FF4AB5
The sketch below uses this information to map the codes to the actual key labels on the remote controller. Once a new code is received, it is masked with ‘FFFF’ to get only four hex digits. IF the resultant code is ‘FFFF’ it is ignored, otherwise the valid code is mapped into a key and displayed on the display module. I created mapping for keys ‘0’ to ‘9’ only but there is no reason for not extending the mapping all keys. Once the key mapping is done, it can be used to execute any useful command.
#include <TM1638.h>
#include <IRremote.h>

// define IR module
IRrecv irrecv(11);
decode_results results;

// define a display module on data pin 8, clock pin 9 and strobe pin 7
TM1638 module(8, 9, 7);

// define code to charater mapping for
// remote control keys '0' to '9'
long grid[] = {
  0x6897,  //0
  0x30CF,  //1
  0x18E7,  //2
  0x7A85,  //3
  0x10EF,  //4
  0x38C7,  //5
  0x5AA5,  //6
  0x42BD,  //7
  0x4AB5,  //8
  0x52AD   //9
};

char cmd[] = {
  '-', ' ',' ',' ',' ',' ',' ',' ', '\0'};

void setup()
{
  Serial.begin(9600);
  irrecv.enableIRIn(); // Start the receiver
  module.setupDisplay(true, 5);
}

void loop() {
  if (irrecv.decode(&results)) {
    long x = results.value;
    x = x & 0xFFFF;
    if(x!=0xFFFF) {
      cmd[0] = mapping(x);
      module.setDisplayToString(cmd);
      Serial.println(x, HEX);
      executeCommand(cmd[0]);
    }
    irrecv.resume(); // Receive the next value
  }
}

char mapping(long x) {
  for(int i=0; i<10; i++) {
    if(grid[i] == x) {
      return ('0'+i);
    }
  }
  return '-';
}

void executeCommand(char cmd) {
  // do something useful
}