The Zodiac WX from Northbound Networks is Dual-Band AC1200 AP that includes 2 Gigabit Ethernet ports and support for PoE. It also integrates Zodiac OpenFlow® engine with OpenWrt operating system. The Zodiac WX works with any standard OpenFlow® 1.3 compatible controller and appears to the controller as a 65-port Ethernet switch.
This post explains how to build a virtual machine to control the wireless AP with a Ryu controller running SimpleSwitch2 (SS2) application from Inside OpenFlow. I have chosen Ryu to control the AP because it supports OpenFlow 1.0, 1.2, 1.3, 1.4, 1.5 and Nicira Extensions. Moreover, it is freely available under the Apache 2.0 license.
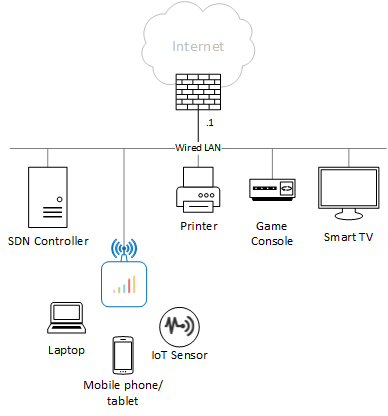
The Zodiac AP will operate in the LAN environment shown in the figure below. So save space, I’ll defer describing how to configure the AP to another post. I recommend, however, that you ensure the Zodiac WX works as a standard AP before you proceed. You can do that by un-checking “OpenFlow Enabled” option in the Controller tab and connect some clients.
Create Ubuntu VM
I’ve created a VM based on the Ubuntu desktop version 16.04.3. Use these instructions to do the same using hyper-v or vmware. Mine uses 1024MB of RAM and 1 virtual processor. I used the username “ryu” in my configuration , but you choose a different username.
Set Static IP address
Your Ubuntu VM (or the physical machine, if you choose) will likely get a dynamic IPv4 address using DHCP. To ensure that your Zodiac-WX always finds the controller, you have to configure a static IP address by adding the following lines to the file “/etc/network/interfaces”.
$ sudo nano /etc/network/interfaces

# The primary network interface
auto eth0
iface eth0 inet static
address 192.168.2.235
netmask 255.255.255.0
network 192.168.2.0
broadcast 192.168.2.255
gateway 192.168.2.1
dns-nameservers 192.168.2.1 8.8.8.8
Restart the networking services and the interface to activate the new IP address
$ sudo /etc/init.d/networking restart
$ sudo ifdown eth0
$ sudo ifup eth0
Verify the new configuration:
$ ifconfig
Finally Verify that you can ping the ZWX before you proceed.
$ ping 192.168.2.103
Install RYU
We follow the instructions provided in https://osrg.github.io/ryu/, but before that, you will need to install pip:
$ sudo apt-get update
$ sudo apt-get install gcc python-dev libffi-dev libssl-dev \
libxml2-dev libxslt1-dev zlib1g-dev
$ sudo apt-get install python-eventlet python-routes python-webob \
python-paramiko
$ sudo apt-get install python-pip
$ pip install --upgrade pip
$ sudo pip install tinyrpc ovs oslo.config msgpack-python
Install ryu from source:
$ sudo apt-get install git
$ git clone https://github.com/osrg/ryu.git
$ cd ryu
$ sudo python ./setup.py install
Verify that ryu-manger runs OK:
$ cd
$ ryu-manager –-version
ryu-manager 4.18
If you get complaints about missing packages, install those until the above command runs without errors.
Install SS2
SimpleSwitch Reimagined (SS2) is a L2 switch controller application for Ryu created by Inside OpenFlow. SS2 has a 4-table flow pipeline. Using multiple tables allows a controller application to implement more logic and state in the switch itself, reducing the load on the controller.
Start by cloning the SimpleSwitch2 code from Github.
$ git clone https://github.com/inside-openflow/simpleswitch2.git
Modify the following two lines in “~/simpleswitch2/ss2/core.py”
from . import config, util --> import config, util
from .app import SS2App --> from app import SS2App
… and modify the following line in “~/simpleswitch2/ss2/app.py”
from . import config, util --> import config, util
SS2 uses table ID 0, 101, 102, and 103, which the Zodiac WX cannot support. So, modify the Table Identifiers section in the “~/simpleswitch2/defaults.cfg” file:
# the learning switch tables
table_acl:        0
table_l2_switch:  5
table_eth_src:    6
table_eth_dst:    7
Finally, run SS2 using ryu-manager
$ ryu-manager --verbose ~/simpleswitch2/ss2/core.py
At this point, the controller should connect with openflow switch, so make sure that Zodiac-WX has the IP address of the AP and the controller configured properly and OpenFlow is enabled. Also, the flow table should be populated
Flow 1
 Match:
  ANY

 Attributes:
  Table ID: 0				Cookie:0x0
  Priority: 700				Duration: 2913 secs
  Hard Timeout: 0 secs			Idle Timeout: 0 secs
  Byte Count: 66604409			Packet Count: 40071
  Last Match: 0 secs

 Instructions:
  Goto Table: 5

Flow 2
 Match:

 Attributes:
  Table ID: 5				Cookie:0x0
  Priority: 1000				Duration: 2913 secs
  Hard Timeout: 0 secs			Idle Timeout: 0 secs
  Byte Count: 0			Packet Count: 0
  Last Match: 2913 secs

 Instructions:

Flow 3
 Match:
  Destination MAC: 01:80:C2:00:00:0
  ...
  ...
Hit CTRL-C before you continue the following steps.
Adding a systemd service
We can write a ryu.service file that causes SS2 to be automatically run when your machine boots. Create a file ~/simpleswitch2/start-switch.sh containing:
$ sudo nano  ~/simpleswitch2/start-switch.sh

#!/bin/bash
ryu-manager /home/ryu/simpleswitch2/ss2/core.py ryu.app.ofctl_rest
Make it executable.
$ sudo chmod +x ~/simpleswitch2/start-switch.sh
Create a file /etc/systemd/system/ryu.service, containing:
[Unit]
Description=RYU

[Service]
User=ryu
TimeoutStartSec=0
ExecStart=/home/ryu/simpleswitch2/start-switch.sh
Restart=always
RestartSec=5

[Install]
WantedBy=multi-user.target
The SS2 crashes occasionally (I’m not sure why yet) so the Restart options above ensure that the service restarts promptly.
Enable the service and start it:
$ sudo systemctl enable /etc/systemd/system/ryu.service
$ sudo systemctl start ryu.service
Verify that the service is active and running
$ systemctl list-units
...
ryu.service               loaded active running   RYU
...
If everything went well, the controller should populate Zodiac WX with several flows. Your wireless clients should have full connectivity to the network.